Thursday, May 17, 2012

Lauren's Princess Plum Blossom


Lauren sent me this photo and gave me permission to post it in my blog.  This is "Princess Plum Blossom" that she made using my Chibi Kokeshi Pattern.  Isn't it darling?  When I saw it I knew I wanted to share it. 

Lauren says   "I’m not usually a very fast crocheter, but as it happens my back was completely OUT over the weekend, and I wound up with a big chunk of “down time”... most of the crocheting was actually done whilst laying on my living room floor!!! I thought you might like to use that...“these patterns can be made horizontally” LOL!"

Thank you for for sharing Lauren!

Sunday, May 6, 2012

Amigurumi Duckie Pattern in Spanish


Thank you to Churi Castellano for translating the Amigurumi Duckie pattern into Spanish!

The English version is here.

PATO  AMIGURUMI A GANCHILLO (CROCHET)

sc= cadena= c;   dc= punto alto = pa;   st= punto bajo= pb;    sl st= punto pasado= pp;  inc= aumento ; dec= disminución;
6 c. en anillo mágico
2 pb en cada punto de vuelta (12 total)
1 pb, pb inc. en el siguiente punto, repetir toda la vuelta ( 18 total)
repetir lo mismo en las 4 vueltas siguientes
1 pb inc. en los primeros 9 puntos, 1 pb en los siguientes 9 puntos ( 27 total)
1 pb en los primeros 6 puntos, 1 pb inc en los siguentes 6, 1pb en los últimos 15 ( total 33)
repetir lo mismo en las siguientes 3 vueltas
1 pb en los primeros 9 p, 1 pb dec en los siguentes 3 puntos, 1 pb en los últimos 18 (30 total)
1 pb en cada uno de los primeros 4 p. y 1 pb dec. en el sig. repetir toda la vuelta ( 25 total)
1 pb en cada uno de los primeros 3 p. y 1 pb dec. en los sig. repetir toda la vuelta (20 total)
1 pb en un punto, 1pb dec. en el siguiente, repetir toda la vuelta y terminar con 2 pb ( 14 total)
coser los ojitos, rellenar y seguir disminuyendo alrededor. Dejar una hebra larga para coser.

Dejo una hebra larga para cerrar y además atravieso con la aguja hacia arriba a un costado y abajo de nuevo y hacia el otro costado, para que la base se quede plana y se mantenga en pie.

Pico
6 pb en anillo mágico
1 pb en el primer punto, 1pb inc. en el siguiente, repetir toda la vuelta ( 9 total)
tejer otra vuelta mas de los mismos 9 puntos.
pp en el sig. punto y deja una hebra larga parta coser.
Tienes que curvarlo en forma de " U "  y coserlo bajo los ojos y entre la 5ª y 6ª vuelta.

Friday, March 23, 2012

Free Amigurumi Duckie Pattern


Amigurumi Duck
Materials used:
Lily Sugar and Cream Cotton Yarn
G crochet hook
2 safety eyes
polyfill for stuffing

6 sc in a magic ring
2 sc in each sc around (12 sc)
1 sc, sc inc in next sc repeat around (18 sc)
sc around (18 sc) for 4 rows
sc inc in the first 9 sc, sc in last 9 sc (27 sc)
sc in first 6 sc, sc inc in next 6 sc, sc in last 15 sc (33 sc)
sc around (33 sc) for 3 rows
sc in first 9 sc, do 3 sc dec, sc in last 18 sc (30 sc)
sc in four sc, sc dec repeat around (25 sc)
sc in 3 sc, sc dec repeat around (20 sc)
sc in one sc, sc dec repeat around, end with 2 sc (14 sc)
Position eyes and attach
Stuff
dec around to close leave long tail.
I used tail to close and then to shape bottom so duck would stand even. Pull the yarn up through the back of the duck and back down to pull in bottom. Repeat on other side of duck.

Beak

6 sc in a magic ring
1 sc, sc inc in next sc repeat around (9 sc)
sc around (9 sc)
slip stitch into next sc and leave long tail for sewing
smash down and sew to body in a curved upside down “u” shape between rows 5 and 6.

SPANISH version is here.


This is a modified version of another free pattern from here:
http://www.craftster.org/forum/index.php?topic=154060.msg1531839#msg1531839.

Monday, March 19, 2012

Ninja GIVEAWAY!!!!!


It's time for a NINJA GIVEAWAY! NINJA! NINJA!

If you would like to win one of my amigurumi ninjas, please visit my Facebook page at https://www.facebook.com/AmigurumiFriends. To be eligible, you must 1) "like" Amigurumi Friends, and 2) post a message under the ninja photo to let me know you would like to enter the drawing. The deadline is March 31, 2012.

You will receive the smaller ninja which is approx 5 1/2 inches tall and 2 1/2 inches wide. I will ship it to the winner free!

Also, you will get an additional entry for each friend that you get to "like" Amigurumi Friends. Just let me know who you have referred. Please make sure that they "like" Amigurumi Friends and enter a comment under the photo.

GOOD LUCK!

Friday, January 20, 2012

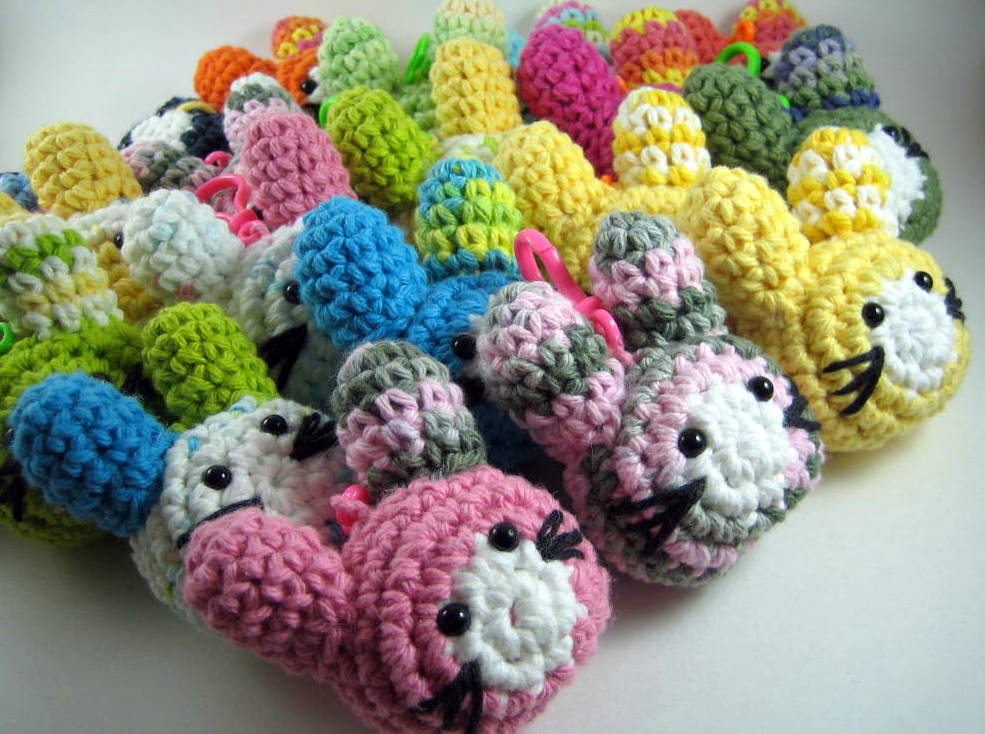
Pack Bunnies


I hope you can appreciate how hard it is to get a bunch of bunnies to line up and stay in place for this group photo!

I'm getting ready for spring craft shows, and everyone expects...BUNNIES! Actually, even in the winter season, people ask me if I have any bunnies, but everyone knows they explode in numbers in the spring.

So I came up with this little "pack bunny". It's a bunny head with funny looking ears and a plastic hook so you can hang him on your backpack, purse, keys, etc, etc.

And yes, you can expect a free pattern for this sometime in the future. ;)

Tuesday, December 13, 2011

Hand Sanitizer Holders...Huh?


Whew!!!! All my holiday craft shows are finished, so I have a chance to slow down a bit. I was able to spend a few hours in my neglected garden today. It was beautiful today after the few days of rain, so the soil was soft and the weather cool. Perfect for pulling the 4 huge bags of weeds.


I still have a few special orders to complete before the end of the year and one of them was for some hand sanitizer holders. I've been making them to hold small, refillable bottles of Purell hand sanitizer. They are convenient for strapping onto your purse, backpack, stroller, sports bag, etc. I made the buttons out of Asian fabrics and crocheted the holders out of different colors of cotton yarn. The holders also have a keychain hook in the back in case you want to attach some keys.


Okay, time for an ice cream break...


Monday, October 31, 2011

Cupcake Ornaments


This weekend I decided to make some ornaments for the holidays, but what to make? Last year I made little kokeshi doll ornaments, but I wanted to try something different.

Have you seen those adorable amigurumi baked goods? Cute crocheted cakes, cookies and cupcakes. Well, they're cute, but what do you do with them? Hmmm, maybe perfect as an ornament????

I used a free pattern from Red Heart yarn here and embellished them with beads and sequins. Don't they look yummy?

Friday, October 21, 2011

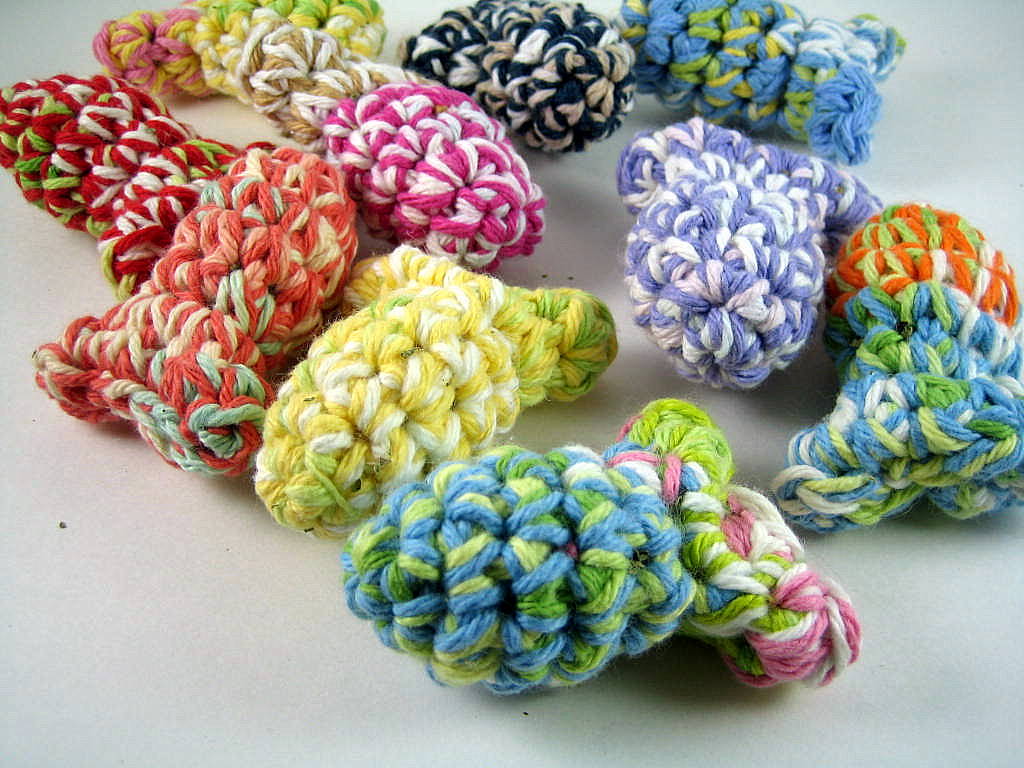
Catnip Fishies


Okay, time for a free pattern!
These are easy and fun to make, and your cat will appreciate them too. They are little fishies filled with catnip, an herb they go nuts over. I like to make them with 2 colors of Lily Sugar and Cream cotton yarn. I crochet both colors at the same time. It's a great way to use up scraps of yarn.


Supplies:
Lily Sugar and Cream cotton yarn in two colors or your choice. Scraps work great!
"J" crochet hook
a little bit of polyfiber stuffing or cotton balls will work
catnip
yarn needle

CATNIP FISH
Crochet 2 strands of yarn at the same time.

Make magic ring*, ch 1
Round 1: 4 sc in magic ring (4 st)
Round 2: (1 sc in next sc, 2 sc in next st) 2 times (6 st)
Round 3: (1 sc in next sc, 2 sc in next st) 3 times (9 st)
Round 4: sc around (9)
Round 5: sc around (9)
Round 6: (sc2tog, sc 1 into next sc) 3 times (6 sc)
Start forming tail
Round 7: sc 2 around (12 sc)
Round 8: (sc 1 into next sc, then sc 2 into next) 6 times (18 sc)
Join with sl st to next st. Fasten off, leaving long end of yarn.
Stuff lightly with poly fiberfill. Put a pinch of catnip inside the fiberfill.Sew the tail together with end of yarn and yarn needle.

* How to make a magic ring http://www.ehow.com/how_4750999_crochet-adjustable-magic-ring.html
Enjoy!

Wednesday, October 5, 2011

It's a new litter of kittens!


For those of you who think I'm not really working...think again! I've got a new litter of kitties. As usual with alley cats, you end up with a mixed litter. There are black ones, gray ones, orange ones and even pink ones! They are all different from the tips of their ears to the pads of their paws.

These little kitties are crocheted with acrylic yarn and they stand about 3 1/2 inches tall. They have cute little cat eyes, a yarn nose and yarn whiskers. I've been making these kitties for a few years now and they are from my own pattern. If you would like to make one, check out my pattern shop at

www.mutts.etsy.com.

Now it's time to work on the mutts...

Tuesday, September 27, 2011

Boshi Boys - 2 Adorable Cats!


Meet Oscar, (in the baseball cap) and Felix, (in the top hat). They are the "Boshi Boys". Boshi means "hat" in Japanese and they are 2 very talented cats that belong to my friend Susan. She asked me to make these amigurumi version of her cats. Unfortunately, Felix passed away recently and to make things worse, someone stole amigurumi Oscar. Is that not just horrible????? So I made her another one, but the one in the photo is the one that was stolen. People can be so disgusting sometimes.


Susan is very talented herself. She has created some really cute cards and stationary featuring her cats who love to dress up and pose for her. Here is her website so you can check out the "real" Felix and Oscar.

http://www.boshiboys.com/about.html


Friday, September 16, 2011

Asagohan Fabric Line


I can't express how much I freaken love this fabric design called "Asagohan" by Hokkoh fabrics. I mean seriously, my heart starts beating faster when I look at it. I am obsessed to the point that I am buying up every scrap of it I can find. I am HOARDING this fabric!


Asagohan means "breakfast" in Japanese, and as you can see, the fabric has a bold, contemporary design of traditional Japanese cuisine elements. There are Japanese veggies and eating and cooking utensils. The colors of black, green and red speak to me. In fact, it is the green that really drew me to this design. I am a green freak. I got my first shipment of 7 yards and the cotton is so, so, so, soft with a hefty weight, and the scent of clean raw cotton. Oh my. I went back online to SuperBuzzy and bought out what was left in stock. The photo is a picture of the second shipment I received today.


What am I going to do with it? Well, it fits my home decor style to a "T" so I intend to make some cute placemats and maybe even frame some of it as wall hangings. But for now, I am just savoring them...


Freaky, I know.

Monday, September 12, 2011

Penguin Pillow Plushies


No, I haven't lost my crochet hook! I'm still making amigurumi, but I wanted to use some of my fleece stash so I started making these penguin plushes. I made a prototype and found it really comes in handy when I'm reading in bed. Its just the right size to sit in my lap and prop my Kindle or Nintendo DS up on so they are at just the right height.

I made the penguins in different colors and designs of fleece. I especially like the pink one in the front. They are stuffed with polyfiber and have plastic safety eyes. Oh, and they have my "Ami Friends Studio" tag on them too.

They are a cute plush animal toy to cuddle or a cool travel pillow. And, I had a lot of fun making them.

Thursday, September 8, 2011

Neck Cooling Ties!


Okay, I'm pretty positive that today is the hottest day of the summer here in Los Angeles. I know it's nothing compared to the heat in other areas, like the desert, but seriously, we are feeling it today. I was in the garden for 10 minutes in my flip flops and sunburned my feeties. So, this seems like the perfect time to introduce my newest project....NECK COOLING TIES!

What are neck cooling ties? Well, they are like bandanas that have a special water absorbing polymer sewn inside. When you soak them in water for a few minutes, they puff up and will hold the water for days. You wear these around your neck and it helps to keep you cool by water evaporation. The outside of the fabric will become dry to the touch, but the moisture stays inside the bandana. These are great for hiking, sports, gardening, and even those in the military. You can put them in the refrigerator before you wear them if you want them really cold. Keep a few extra in the cooler when you go out to the beach and switch them out to stay extra cool.

I've been wearing these at home while I'm crafting to keep cool, and if I need an extra boost, I'll dip them in cool water and put them back on. You can keep them clean by washing them with some shampoo.

The reason I decided to make these is because I found some super cute fabrics and needed something to make with them. I know other people are making neck coolers, but I just love the fabrics that mine are made with.

If you see me at a craft fair in the next coming months, don't forget to check out my neck cooling ties.

Wednesday, August 31, 2011

How many is too many cats?


I just finished making this big litter of cat heads in different colors. They are cute hanging on your keychain, backpack zipper pulls, cell phones or can even be made into pins or magnets. Or, you can use them for juggling.

Here's a free pattern for them:

Juggling Cats

You need:
Lily Sugar and Cream in colors of your choice.
“G” crochet hook
Polyfiber stuffing
Optional craft eyes (6 mm)
Yarn needle

Body:
Using white yarn color for face:
Make magic ring*, ch 1
Round 1: sc 6 into a magic ring, pull tight.
Round 2: sc 2 into each sc around (12 sc)

Change to yarn color for body:
Round 3: (sc 1 into next sc, then sc 2 into next), around (18 sc)
Round 4: (sc 1 into next 2 sc, then sc 2 into next) around (24 sc)
Rounds 5 to 9: sc around (24 sc)

If you are using plastic safety eyes, place them now.
Round 10: (sc 1 into next 2 sc, sc2tog) around (18)
Round 11 (sc 1 into next sc, sc2tog) around (12 sc)
Stuff with polyfiber.

Round 12: (sc2tog) around (6 sc)
Join with sl st to next st. Fasten off, pull tight to close and hide yarn end.

Ear - (make 2):
Make magic ring, ch 1
Round 1: 4 sc in magic ring (4 st)
Round 2: (sc 1 into next sc, sc 2 into next sc) twice (6 st)
Round 3: (sc 1 into next sc, sc 2 into next sc) three times (9 st)
Join with sl st to next st. Fasten off, leaving long end of yarn.

Tail
Ch 12
2 Sc into 2nd ch from hook, 2 sc into each ch until end
Fasten off, leaving long end of yarn.

Assembly:

Sew ears on top of face. Sew tail on back of body. Embroider some whiskers…and play!

* Don't know how to make a magic ring? Do a search on YouTube to see a demo...

Wednesday, August 24, 2011

Sanrio Piano Time


Okay, the sun is up so I took my Sanrio family out to the piano. I actually use this room as my studio so it's got balls of yarn around everywhere. As you can see, Charmmy Kitty is huge! She's about 12 inches tall and the biggest amigurumi project I've ever made. She took me 3 days to make. In case you don't know, Charmmy Kitty is Hello Kitty's pet. (It seems a little weird to me for a cat to have a pet cat, but okay.) The rabbit with the pink hoodie is My Melody and the colorful rabbit with the stick like body is Usahana. Of course, there's Hello Kitty herself and I made a black Hello Kitty with a pink strawberry body.


Tuesday, August 23, 2011

Hello Kitty Strawberry!


I thought I'd try making some Hello Kittys for a change. I found a cute book of Hello Kitty amigurumi and am giving it a go. The first one I made was Strawberry Hello Kitty. It looked small in the photo, but when I made it, it came out quite large. It measures 10 inches tall. I liked how this Strawberry Hello Kitty came out so I also made a black one with a pink strawberry, a very large Charmmy Kitty, an Usahana and a My Melody. Later, I'll have to take a photo of this group, but they are too big for my photo box, so I need to do it later when the sun comes up. Okay, back to making more Hello Kitty...

Sunday, August 7, 2011

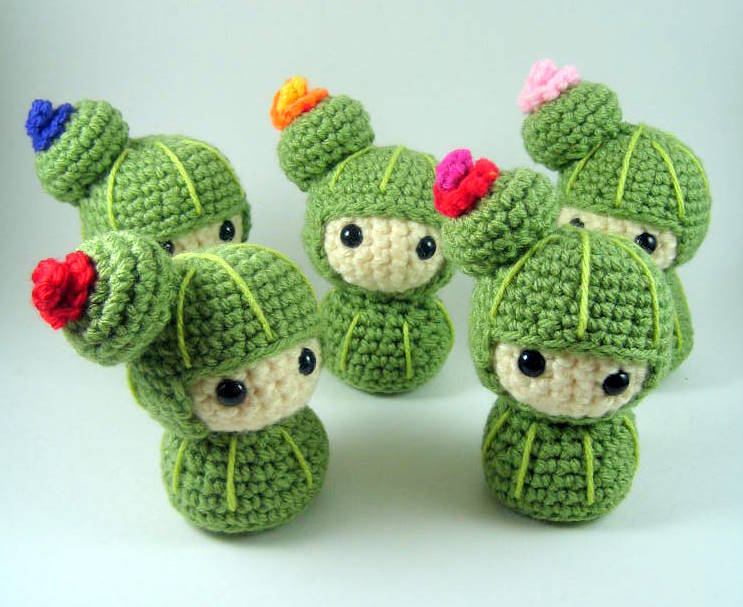
Cactus Kokeshi Dolls


Is it just me or is cactus really popular right now? I see cactus gardens popping up all over. I saw some really cute cactus plushes and decided what the heck, why not make a cactus kokeshi doll. So I did, and here is the result.

Then people started asking for a pattern, so I wrote one up.


Hmmm...cactus. I really should start my own cactus garden outside too...

Wednesday, August 3, 2011

Big Max, a dog


I made this pup, and thought long and hard for a name for him. Finally, I settled on Max...well BIG MAX, because someday he's going to grow up to be a big dog. At least that's the way he thinks and feels. He already thinks he's the alpha dog in the pack.

So I wrote up a pattern for him because I bet there are a lot of people who have their own Big Max's at home and want to crochet up a dog just like him.

Check out this little Rottie, who also expects to grow up big...

Thursday, July 28, 2011

Mei Mei a Chinese Kokeshi Doll


I'm not sure if it's appropriate for me to say Mei Mei is a Chinese Kokeshi doll. There must be a different word in Chinese that's equivalent to the kokeshi doll, but I don't know it, so go with me here.


I just think her hair style with the long strands in the front and the bun in back looks Chinese. At least that's the way I remember them from Bruce Lee movies. No negative connotations here because I am a big martial arts action fan. I love Jet Li.


Getting back to Mei Mei... She was created because I had a request for a Ni Hao Kailan doll. Do you know her? She has her own cartoon. In fact, here is a picture of the finished doll.


Yes, she is wearing headphones. No she doesn't wear them in the cartoon. That's just the way my friend wanted it.


Getting back to Mei Mei. After making Ni Hao Kailan's hair, I decided to try it out on my little kokeshis and it worked out great. So I wrote up a new pattern for it and it's available in my Etsy shop.


Check it out!


Sunday, July 24, 2011

Who is Mugsy?


The first time we saw Mugsy, he was a mess. He's a stray black cat that lives in our neighborhood. Part of his ear looks like it was bit off. He was thin and scraggly, so his silhouette looked like a Halloween cat. Still, you can see that he was muscular. He was a scary looking cat. We thought he was terrorising another little stray cat outside, so we gave him the gangster name, "Mugsy".

We'll as time went on, we softened up around Mugsy and he started to grow on us. As it turns out, he is a very gentle guy around us and our other stray, although it seemed like he was getting into cat fights somewhere else in the neighborhood. He'd show up now and then with more battle scars.

So now, wheneever I make a black cat, I think of Mugsy. I even named my new pattern after him. Amigurumi Mugsy is about 5 1/2 inches tall and 4 inches wide. He's also fun to make, and fun to look at.